Getting Started with Dante Virtual Soundcard
Dante Virtual Soundcard is a software application that turns your PC or Mac into a Dante-enabled device.
It allows Dante audio traffic to be transmitted and received using the standard Ethernet port.
Note: Dante Virtual Soundcard 64 channel cannot be used by itself. There must be a Dante leader clock present on the network. DVS -> DVS can only work if one of them is DVS Pro.
Recording Audio using Dante Virtual Soundcard and a Digital Audio Workstation (DAW)
1) Connect your System
You can connect your computer to the Dante Device directly or using a network switch.
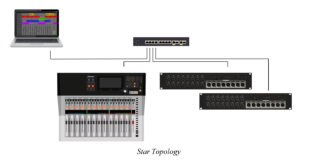
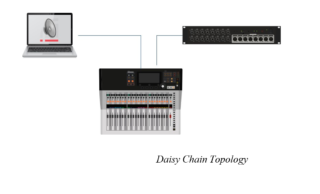
2) Check if your device is set to Switched mode.
Some Dante devices will have one Dante port, and some will have two. A secondary port typically defaults to “Daisy Chain” or “Switched mode.
”If you, for example, are using the primary port to connect other Dante Devices, like Stage Box, you can connect your machine to the secondary port. However, you must check with the manufacturer to see if the secondary port is configured to switched mode.
3) Computer Preparation
- Install Dante Controller
Dante Controller is a software application provided by Audinate that allows users to configure and route audio and video around Dante networks. It is available for Windows and macOS.
- Install Dante Virtual Soundcard
Dante Virtual Soundcard is a software application that turns your PC or Mac into a Dante-enabled device, allowing Dante audio traffic to be transmitted and received using the standard Ethernet port.
The latest version of Dante Virtual Soundcard supports the Core Audio (Mac OS X), Steinberg ASIO (Windows) for professional audio applications like Logic, Reaper, Pro Tools, Cubase, etc, and WDM (Windows) audio interfaces to be used with any supporting audio application like Zoom, Teams, VLC, web browsers, etc.
Download Latest Dante Software | Audinate
Refer to www.getdante.com for the latest Dante software, user guides, and support FAQs.
4) Network Setting
All devices in your Dante network, including Dante Virtual Soundcard, must be in the same subnet.

Set your machine and Dante Device to automatically get the IP address. Your PC or Mac TCP/IP network configuration setting should be set to ‘Obtain an IP address automatically’.
If a DHCP server is present, the computer and Dante devices will all acquire their IP addresses via DHCP or automatically assign themselves an address in range 169.254.*.*
You can manually assign IP addresses if required, but it is not necessary.
5) Switch Settings
If you use an unmanaged switch, check if EEE (Energy Efficient Ethernet), IGMP Snooping, or QoS are enabled by default. In some cases, this can block significant Dante traffic. If you are using a managed switch, there are some essential considerations to take care of.
- Ensure that IGMP Snooping is OFF
- Ensure that EEE Energy Efficient Ethernet is OFF
If you have mixed traffic types (audio and non-audio data), you can configure QoS (Quality of Service) to manage and prioritize audio traffic.
You can get more details about optimizing switch settings for Dante Audio-Video Traffic at the link below.
Managed Switch Tutorial (Cisco CBS350-Series)
6) Dante Controller and Dante Virtual Soundcard setup
Open Dante Controller and check if you are using the correct Network interface. (File > Interfaces)
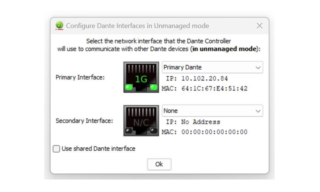
Open Dante Virtual Soundcard, but before starting the application, review the settings for Audio Interface, Audio Channels, Dante Latency, and Network Interface.
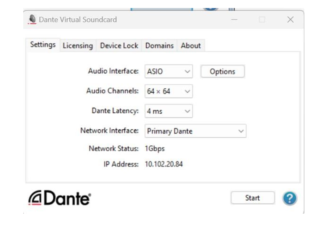
See the Dante Virtual Souncards’s User Guide for more information.
Check if you can see all Dante Devices and your machine on Dante Controller.

Problems to see any device? Follow the instructions below;
- Dante Controller: In Dante Controller, I can’t see my Dante-enabled device | Dante (getdante.com)
- For Dante Virtual Soundcard in Dante Controller, I can’t see any device information under Device Status or Clock Status. | Dante (getdante.com)
- Dante Controller/DVS: In Dante Controller I can’t see Dante Virtual Soundcard, but I can see my Dante-enabled devices. | Dante (getdante.com)
7) Network Routing
Dante routing is performed by associating a receiving (Rx) channel with a transmitting (Tx) channel. This is called ‘subscription’.
Open the “Routing” tab of Dante Controller, press the [+] button to expand the view, then check the grid so that the computer receives the correct channels from your Dante Device (Digital Mixer, I/O Racks, etc…)
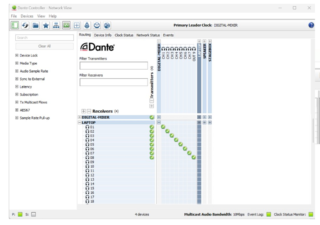
Important: This getting start guide assumes that the output patch of your Dante hardware Device and the input patch of your DAW are already configured. Please get in touch with the manufacturer to get more guidelines about I/O settings.
8) Monitoring Audio Using Dante Controller.
Dante Controller offers a way of checking that audio is being sent and received from the transmitter to the receiver.
Supported devices will also show the following channel metering icons in the Signal column, indicating the presence of audio on subscribed channels:

9) Check your DAW
Enable the record button to check that audio is reaching your DAW.
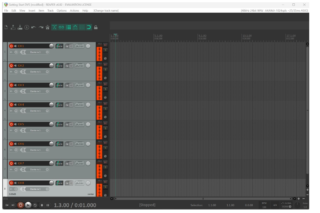
Please check with your DAW developer on changing the I/O settings to get audio from your Dante Network.

If you want to know more about how to set up your Dante Network and get advanced guidelines, get to know our Dante Certification Program.

