DDM Fresh Install from a Backup
Before you start:
- Installation requires access to the DDM license server at https://software-license-ddm.audinate.com/ on port 443.
- For further administrative requirements, refer to Information for Network Administrators tech note.
1. Create a backup of the current configuration
Via the DDM web interface, save a copy of the current configuration from Settings > Update and System Information > System Configuration > Download. This will save a .tgz file to the computer and the following information is saved:
- Domain names and credentials (domain credentials are shared between domains and devices to establish membership)
- Device enrolment information
- User and role information, including usernames, passwords (encrypted), role names, etc.
- Dashboard alerts
- External services configuration, (LDAP, SNMP).
- Audit Log information
- LDAP groups
- High Availability configuration (NOT FORMED)
- TLS upload
- Shared audio configurations
Refer to Updates and System Information Settings section in the Help for more information.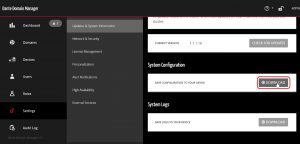
2. Create a new virtual machine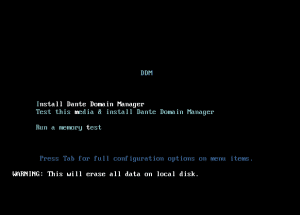
You will need to obtain the latest DDM ISO from the Downloads page. On that same page, you will find multiple installation guides for various VM hypervisors and an installation which describes bare metal installation. Choose the guide that matches your environment and follow the instructions.
Note. You can create a new machine whilst the current system is still running.
3. Configure IP settings within the VM’s settings
After the machine has finished installing, you’ll be presented with the Main Menu. Configure the virtual machines IP settings as required by selecting Configure Interfaces: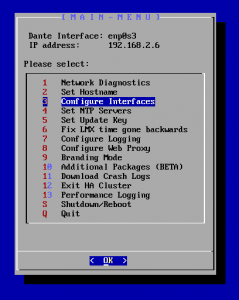
Enter your IP settings. Below is an example of a static IP configuration: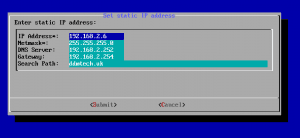
You should now be able to access the DDM web interface.
4. Upload the Configuration to the Server
To access the DDM web interface, open a web browser and enter the IP address or name of DDM. The first step in the installation process will ask if you want to create a Fresh Installation or Restore a configuration. Choose Restore Configuration: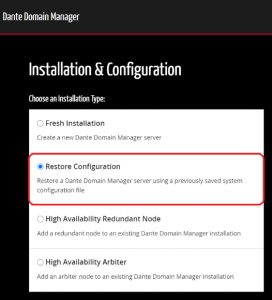
After selecting this option, you will be asked to upload the configuration, which is the backup saved from the other installation saved as a .tgz file. 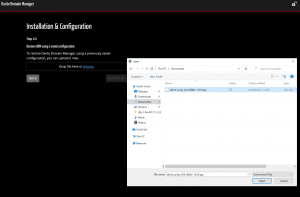
Locate the file by using the ‘Browse’ option, and then upload.Note: if you had a TLS certificate uploaded, you may need to refresh your browser at this point to proceed, as this will have transferred from the previous system.
At this point, you will be presented with the standard DDM login screen. Once logged in, you will need to activate the license from the previous system (requires access to https://software-license-ddm.audinate.com/). You can either do this manually by deactivating the license within the previous system and copying it across, or if you do not have access to the previous system contact Audinate Support, who can remotely deactivate the license. 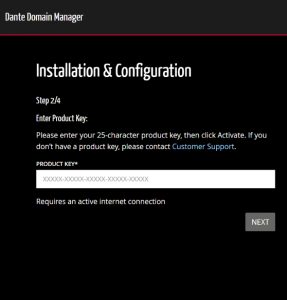
Once licensed, the DDM web interface should appear with the saved configuration as before.