5 Uses for Dante Bridging Devices
Dante Bridging Devices are essential pieces of kit for use in a number of audio production scenarios, but what issues do they solve?


What is a Dante Bridging Device?
Any device that supports multiple Dante interfaces that can be independently configured and audio internally routed (not routed via Dante) works as a Dante bridging device. Dedicated bridge devices like Studio Technologies Model 5482 Dante Bridge or Model 48D have two Dante modules built in. Other bridging devices can take the form of I/O frames that support adding multiple Dante cards like the NTP Penta 720 or Yamaha RSio64-D. Devices or cards can support from 4-128 channels of Dante audio to fit your unique audio production needs.
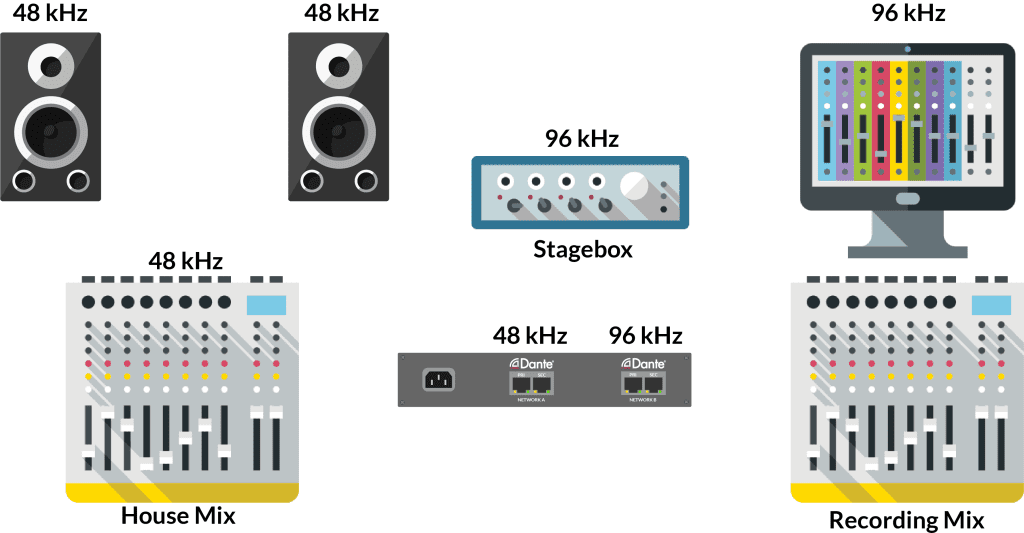
1. Sample Rate Conversion
While Dante allows devices with differing sample rates to co-exist on the network, you can’t send audio between devices with different sample rates. Dante itself does not do sample rate conversion. This is where a Dante Bridging device or I/O frame with multiple Dante cards comes in handy. Say you want to record at 96kHz but play out audio at 48kHz to the auditorium. To accomplish this, you can set each Dante interface (card) to the respective sample rate and allow the device’s internal routing to send audio and do sample rate conversion between the two Dante interfaces. From there you can send audio at 96kHz to the devices for recording and at 48kHz to devices for sound reinforcement.
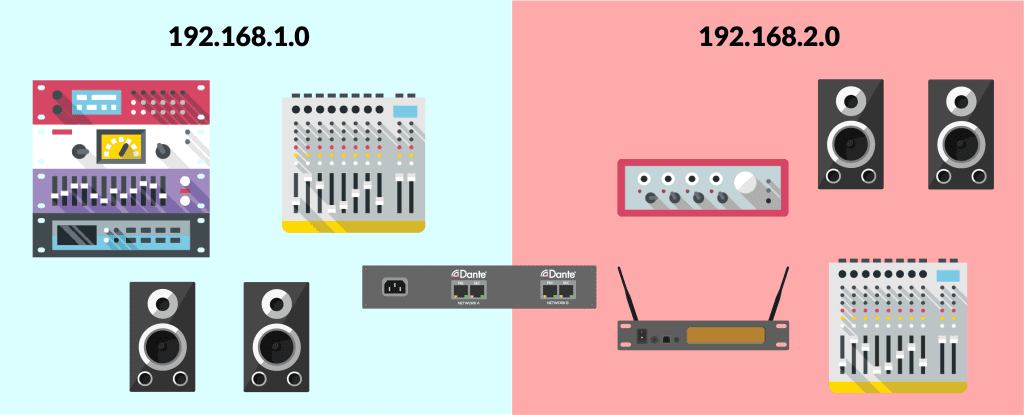
2. Link Independent Dante Networks
Traditional Dante requires all Dante Devices to be in the same LAN. While Dante Domain Manager allows you to send audio across subnets and VLANs, a bridging device can help accomplish this too. Even with Dante Domain Manager your network administrator might not want to open ports for audio transport across subnets, a non-networked airgap between systems might be desired, or you may need to connect systems with different clock sources. (When you create shared audio groups in Dante Domain Manager, they will share a clock leader.) This is also simple way to keep audio and video on separate networks/VLANs. Finally, if you want to connect, but not combine two standalone Dante networks on different switches a bridging device is key.
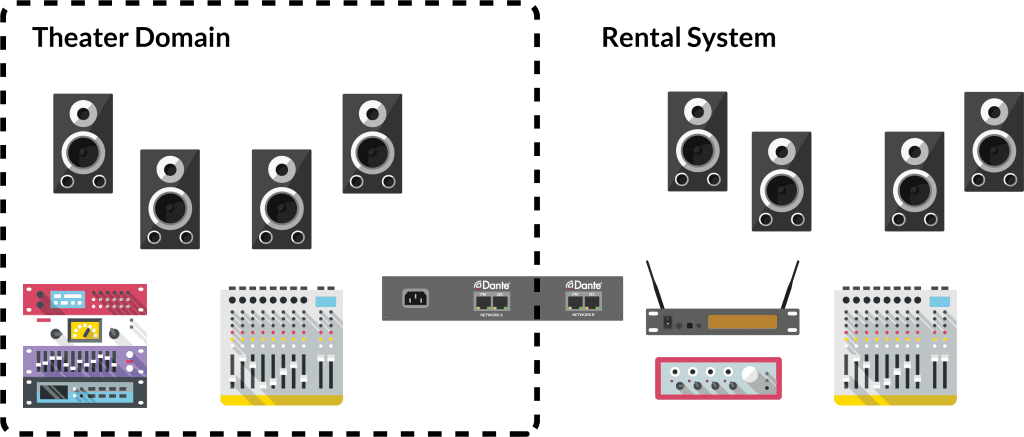
3. Connect Dante Domain Manager to the Unmanaged Network
Once Dante devices get enrolled into Domains with Dante Domain Manager, they can no longer share audio back to devices that are “unmanaged” (i.e. not enrolled in Domains). You might have a theater or stadium where all devices are enrolled in Domains but need to send audio from a touring act’s system to the installed sound system or send audio to a remote truck. Dante Bridging devices allow you to enroll one interface into a Domain and leave the other unmanaged and route the audio internally between the cards. This allows you to share audio via Dante without giving guests access to your whole Dante system.
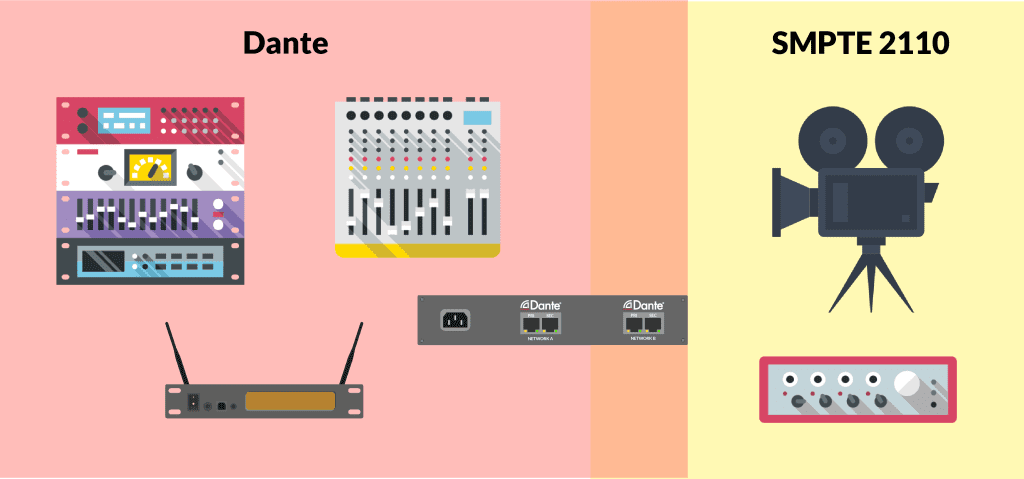
4. Interoperation with SMPTE 2110 or AES67
Dante and SMPTE 2110/AES67 can share a network but there might be instances where you prefer to keep your Dante devices segmented from these other AV standards. A few reasons might be you wish to disable PTP version 1 clocking in the SMPTE network/Domain but you have Dante devices that require it or you wish to keep SMPTE video flows out of the Dante VLAN. One interface can be set to standard Dante and the other to SMPTE 2110/AES67 Interop mode to create an effective Dante to SMPTE 2110/AES67 bridge.
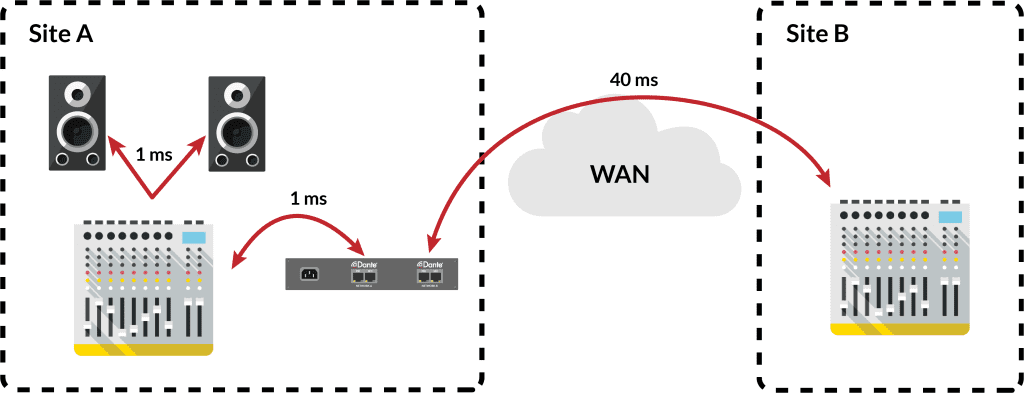
5. Set Multiple Latencies
Interest in Dante over longer distances for remote production has increased over the last couple of years. Dante Domain Manager makes this possible by allowing Dante across the WAN, sites to be clocked locally with GPS, and longer latencies up to 40ms to be set. Dante latency is set per device and audio always plays out at the higher of the two latencies between devices. For Dante over longer distances, you want to keep local device latencies low and use a higher latency for the device sending audio across the remote connection. The best way to accomplish this is to have a bridging device at one or both sites with one Dante interface set to 1ms for the local connections and the other set to a higher latency (up to 40ms) for the remote connection. This way you can keep the local devices and mix at 1ms latency and only use the higher latency across the link where it’s required.
Stay up to date with the Dante Journal
* indicates required fields